


Summary
Replacing a single garage door takes two people a full day, and most of the risk sits in the torsion or extension springs. Expect to spend $750 to $1,700, with labor making up roughly $200 to $500 of that. The work moves from releasing spring tension and removing the old door to stacking new sections, winding springs, and testing balance and auto-reverse.
Signs Your Garage Door Needs Replacement, Not Just Repair
A typical garage door cycles about 1,500 times a year, so wear shows up fast. Learning how to replace a garage door starts with an honest look at whether the door is finished or simply needs a part. One bad roller is a repair; a failing door is a replacement.
- Panels are cracked, warped, or dented across several sections
- The door sags in the middle or stops halfway when you lift it by hand
- Grinding and popping continue after you lubricate the hinges and rollers
- Your garage stays freezing all winter and your heating bills keep climbing
- The door is past 20 years old and matching parts are hard to source
Most garage doors last 15 to 30 years. Past that, repair bills stack up faster than the price of a new door.
Torsion and Extension Garage Doors: Spot the Difference
Two spring systems dominate the market, and they differ in where they mount. Torsion springs sit on a steel shaft above the opening, bolted to the header. Extension springs stretch along the upper roller tracks on each side.
Extension systems went in quickly, which made them popular. Early versions ran without a containment cable, so a snapped spring could fly across the garage. Torsion systems fixed that, ride quieter, and let you tune the tension so the door holds position at any height.
Identify your spring type before you order anything, since it changes your removal steps and your hardware list.
Choosing a New Garage Door: Materials, Styles, and Hardware
You'll pick from three common materials. A steel garage door resists dents, holds paint for years, and asks the least in maintenance. Fiberglass shrugs off salt air but cracks in a hard freeze, and wood looks best while needing refinishing every few years.
Size comes next. A standard single door runs 8 or 9 feet wide; a double runs 16 feet. Measure the opening width and height, the headroom above it, and the side room on both jambs before you order.
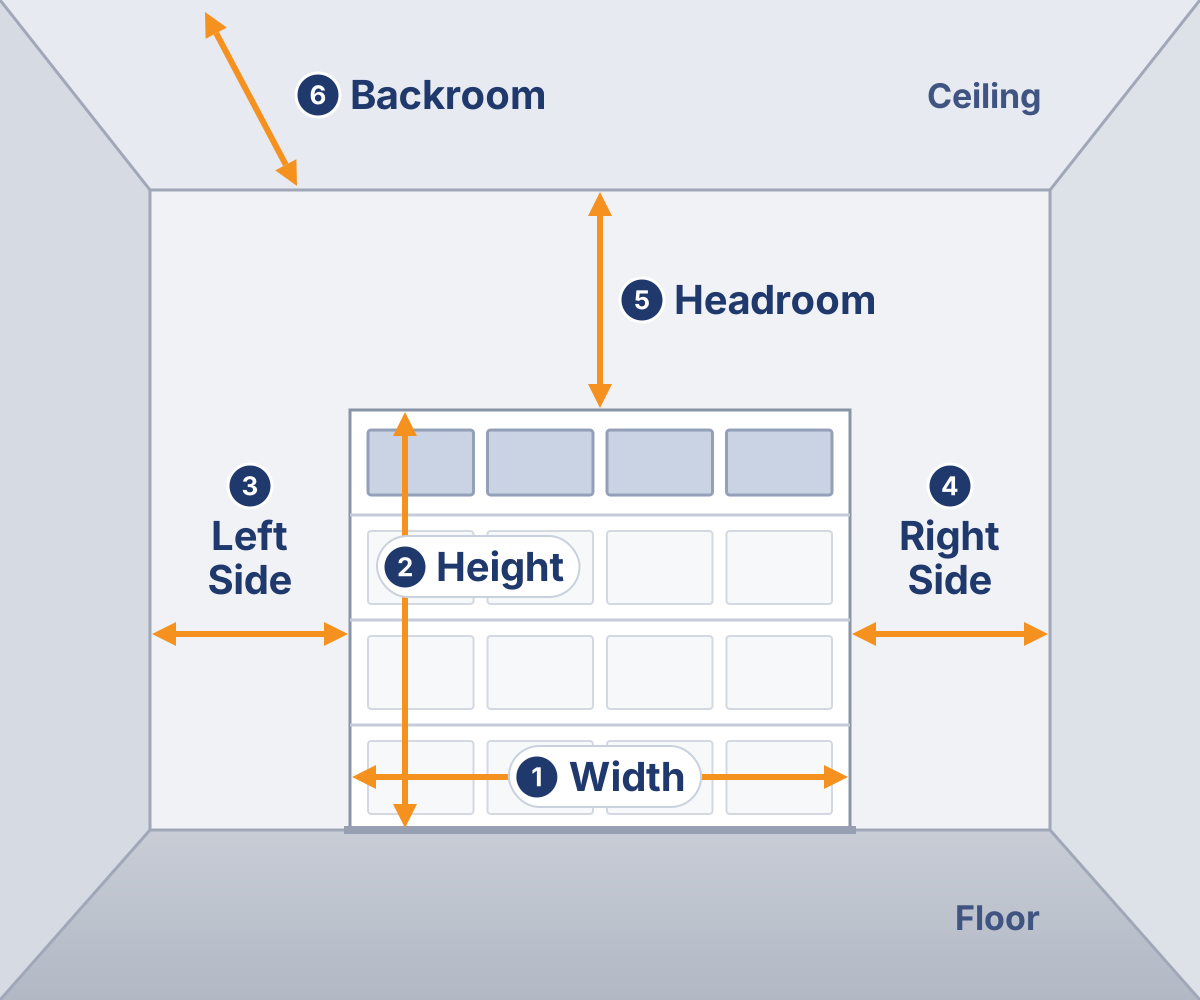
Insulation matters when the garage shares a wall with living space. R-6 suits a detached building; R-12 or higher earns its keep on an attached one. Your hardware gets replaced too, so choose an opener with photo-eye sensors and auto-reverse.
Garage Door Replacement Costs: Materials, Labor, and Extras
Most homeowners spend between $750 and $1,700 to replace a garage door, with the national average near $1,200. Labor accounts for roughly $200 to $500 of that figure.
| Door Style | Typical Door Cost |
|---|---|
| Sectional panel (most common) | $500 to $1,800 |
| Tilt-up single panel | $400 to $1,200 |
| Roll-up | $850 to $2,500 |
| Carriage house style | $1,000 to $4,000 |
Size, material, insulation, and custom sizing drive that number up. Doing the work yourself saves the labor line and nothing else.
Your Garage Door Replacement Timeline From Prep to Test
Set aside a full weekend day for a single door and a day and a half for a double. Pro crews finish in three to five hours because they remove garage doors every week.
- Measure and order your door, two to six weeks ahead of install day
- Empty the garage and set up a staging area, 30 minutes
- Release spring tension and strip out the old door, 2 to 3 hours
- Prep the opening and check the jambs, 30 minutes
- Stack and fasten the new sections, 2 to 3 hours
- Assemble the tracks, springs, cables, and drums, 2 hours
- Mount the opener, then balance and test the door, 1 hour
Essential Tools and Materials for Garage Door Installation
Gather everything before you start. Stopping halfway for a socket leaves a half-hung door in an open garage.
- Cordless drill, impact driver, and a socket set
- Four-foot level and a 25-foot tape measure
- Two pairs of locking pliers
- Winding bars sized to your spring cones
- Stepladder, sawhorses, and a moving blanket
- Safety glasses and cut-resistant gloves
- Lag screws, rear track hangers, and angle iron
- Bottom seal, perimeter weatherstripping, and garage door lubricant
Quick Tip
Use real winding bars, never a screwdriver or a length of rebar. That one shortcut causes most of the serious injuries in this project.
Spring Safety Precautions Before You Touch Anything Else
A garage door spring stores enough energy to break bones. Torsion springs on a double door each hold hundreds of pounds of pull, and that force stays loaded until you release it.
- Treat every spring as fully loaded until you've proven otherwise
- Wear safety glasses and gloves for the entire removal
- Keep your head and body out of the arc of the winding bars
- Never cut, weld, heat, or drill a spring
- Clamp locking pliers to the track before you loosen anything
How to Safely Unwind Torsion Springs Before Removal
If you're handling this step yourself, keep the order exactly as written:
- Close the door completely and unplug the opener.
- Clamp locking pliers on the vertical track above the bottom roller.
- Insert a winding bar fully into the bottom hole of the winding cone.
- Hold that bar steady and loosen the two set screws on the cone.
- Unwind a quarter turn at a time, swapping bars as you rotate.
- Count the turns; most springs hold seven to eight.
- With the tension gone, loosen the drum set screws and free the cables.
Stop and call a professional if a bar slips, a cone binds, or the spring shows rust and gaps between coils.
How to Take Off a Garage Door and Clear the Opening
With the springs relaxed, the door comes apart from the top down. Bring a helper: sections weigh 40 to 80 pounds each, and a full double door can top 400 pounds.
For extension systems, raise the door and clamp the tracks so it can't drop. Tie the springs off to the track, then detach the cables from the bottom brackets.
- Disconnect the opener arm from the top section.
- Unbolt the top hinges and lift that section off with your helper.
- Pull the rollers and brackets from each section in turn.
- Rest glazed sections on a padded surface so the glass survives the day.
- Unbolt the vertical tracks, then the horizontal tracks and rear hangers.
Sweep the opening and press a screwdriver into the jambs and header. Rotted wood won't hold lag screws, so replace it now.
Overhead Garage Door Installation: Step-by-Step Assembly
New sections stack from the bottom up, and the first panel sets the geometry for everything above it. Keep the installation manual open; the garage door installation diagram inside gives exact bracket spacing for your model.
- Set the bottom section in the opening and level it, shimming the low side until the top edge reads true.
- Attach the bottom brackets and rollers, then nail through the jamb, bending each nail over the section.
- Add the next panel, install the hinges between sections, and slide the rollers into their brackets.
- Work up the stack, checking level and plumb at every panel.
- Install the strut across the top section while it lies flat on a moving blanket, which keeps a steel face scratch free.
- Mount the opener bracket between the top two sections.
- Bolt the vertical tracks to the jamb brackets, raise the door halfway, and clamp it to align the horizontal tracks.
- Hang the rear track supports with angle iron, then thread stop bolts into each horizontal track.
- Mount the spring assembly and shaft per the installation instructions, then attach the cables to the drums.
- Wind the springs to the turn count on the label. Some systems wind with a drill; standard torsion springs need winding bars.
Finish by coating the springs, hinges, and rollers with a lubricant made for garage doors. Household oil attracts grit and shortens part life.
Installing the Bottom Seal and Weatherstripping Correctly
The bottom seal slides into the retainer under the lowest panel. Spray the channel with silicone, then feed the seal from one end while your helper pulls from the other. Leave half an inch of overhang on each side, then trim it flush.
Perimeter weatherstripping nails to the jambs and header. Close the door first, then set each strip so the flexible lip just touches the panel face. Too much pressure drags on the door and wears the seal out early. If daylight still shows at the floor, switch to a thicker bead-style seal.
Testing, Balancing, and Final Checks After Installation
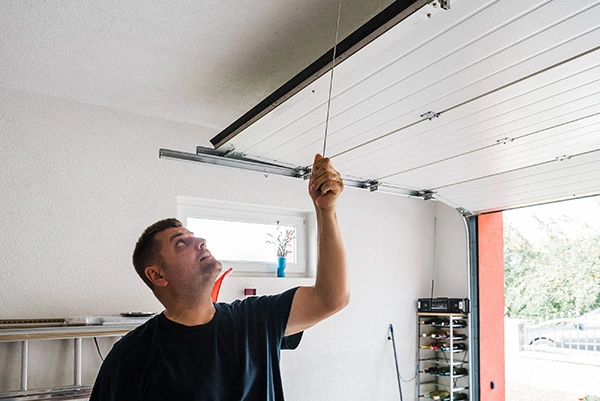
A balanced door does most of the lifting itself. Pull the opener release cord, raise the door to waist height, and let go. It should hold without drifting.
- The door holds steady at half open with the opener disconnected
- Both cables sit evenly on the drums with no slack
- Photo-eye sensors sit no higher than 6 inches above the floor
- The opener reverses within two seconds when the beam breaks
- The door reverses after contacting a 1.5-inch board laid flat on the floor
- No roller binds and no section rubs against the track
If the door creeps open or closed on its own, the spring tension is off. Add or remove a quarter turn until it holds.
Garage Door Problems Worth Handing to a Professional Team
Some parts of this job reward experience more than patience. Torsion spring work tops that list, along with any door heavy enough to pin a person.
- The header or jambs need structural repair
- Your opening falls outside standard sizes
- The springs are rusted, bound, or already broken
- You're working without a second set of hands
- The door arrived with no manufacturer instructions
Putting off a failing door costs more than fixing it. A sagging panel strains the opener, a frayed cable snaps, and the door ends up stuck open overnight.
Feldco has served over 500,000 homeowners across Illinois, Wisconsin, Indiana, and Iowa, replacing more than 100,000 doors along the way. Factory-trained crews handle the measuring, spring work, haul-away, and safety testing in one visit. Compare garage door styles and materials, then get a free quote and talk through your opening with a specialist.
FAQs
How long does it take to replace a garage door by yourself?
Plan on 8 to 12 hours for a single door and up to a day and a half for a double. A trained crew finishes the same job in three to five hours.
Can one person replace a garage door alone?
You can handle the prep, tracks, and hardware solo, but not the panels. Sections weigh 40 to 80 pounds and need a second person holding them square while you fasten them.
Do you need a permit to replace a garage door?
A straight swap into an existing opening rarely requires a permit. You'll need one if you change the opening size, modify the header, or add wiring. Your HOA may set rules on style and color.
How do you dispose of an old garage door?
Steel and aluminum sections go to a scrap metal recycler, sometimes for a small payout. Wood panels go to a construction debris drop-off, and most installers haul the old door away for you.
Can you reuse the old tracks and hardware with a new door?
Replace them. Tracks, rollers, hinges, and springs are matched to a specific door weight and panel thickness, and mixing old parts with a new door voids most warranties.


 866-4FELDCO