A Guide on How to Get Paint Off Windows
Windows are meant to be looked out of, to have a clear and beautiful picture of the outside elements, and to enjoy the sun, colors of the trees, passersby, and to watch your kids play in the yard.
What’s infuriating is when you can’t seem to get a smudge off of the window and wonder what it could possibly be. Chances are, it’s probably a streak of dried paint or your window was shot with paintballs using a paintball gun, and homeowners and do-it-yourselfers know that paint on a window isn’t the end of the world.
With just a few minutes of your time, you can once again have clean and clear windows, the way they’re meant to be.
Step One: Determine How Much Paint is on the Window
This first step will require you to get up close and personal with your window. If you’re worried about multiple windows that may have paint on them (from a possibly sloppy paint job in different rooms throughout the house), then grab a pad of paper and keep note about the amount of paint on each window’s glass.
By noting how much paint you have on your windows, you’ll eventually determine what size scraper you need to remove the paint. More often than not, a window will just have a small line of dried paint that needs to be removed, and this little smudge can be peeled off with the help of a razor blade.
If you need something bigger than a blade, your local hardware store will likely carry multiple sizes from mini paint scrapers to professional grade ones.
Step Two: Gather the Rest of Your Supplies
In this method, you’ll be using a razor blade (or whichever paint scraper size you ultimately decided would do the job most effectively), soap and warm water, and glass cleaner. This is one of the best methods because you probably have a lot of these items laying around the house.
Here is a full list of the items you will need:
- Razor blade or paint scraper
- Bucket
- Warm water and dish soap
- Sponge, preferably one with a rough surface on one side
- Glass cleaner
- A rag or paper towels
Step Three: Lubricate the Window
You might be concerned that the razor blade will scrape the surface of the glass. The reason why you’re using warm water and soap is to lubricate the window to prevent this. Take your sponge and gently, but firmly, apply the soap on the areas affected by the dried paint.
If there are multiple spots where you see paint that needs to be removed, then keep applying the soapy water to ensure that the window doesn’t become completely dried. You want to avoid inflicting scratch marks on the glass surface.
You can also use other combinations of household chemicals or ingredients to lubricate or loosen the paint, like white vinegar.
Step Four: Use Your Razor Blade
While using a razor blade is one of the easiest and quickest ways of removing paint off of your windows, this part does require some skill. Make sure you’re holding the razor blade at a 45-degree angle.
The idea is to get the blade closer to being in a flat position rather than vertical. Again, this is to prevent scratching and marking up the surface of your window. You don’t want to look out of your windows and be forced to notice all of the scratches blocking your view.
Position the razor blade at the top of the spot of dried paint and apply a gentle but firm amount of pressure in a downward motion. Repeat this process until all of the paint has been removed. Remember to keep lubricating the areas of dried paint streaks with your warm soapy water.
With slow, downward motions, the wet and dampened paint should come off in one piece. Be sure to remove the paint off of the razor blade before pressing it on the surface of the window again.
This will ensure that the blade is effective and able to remove more of the paint. Scrape the blade in one direction, as this will also help prevent scratches.
Listen for any sound that the razor blade makes that may indicate it’s scartching the glass. If it feels like the razor blade is particularly resisting the motions, then your blade could be dull and ineffective. Change it out for a new one to be safe.
Step Five: Clean the Glass
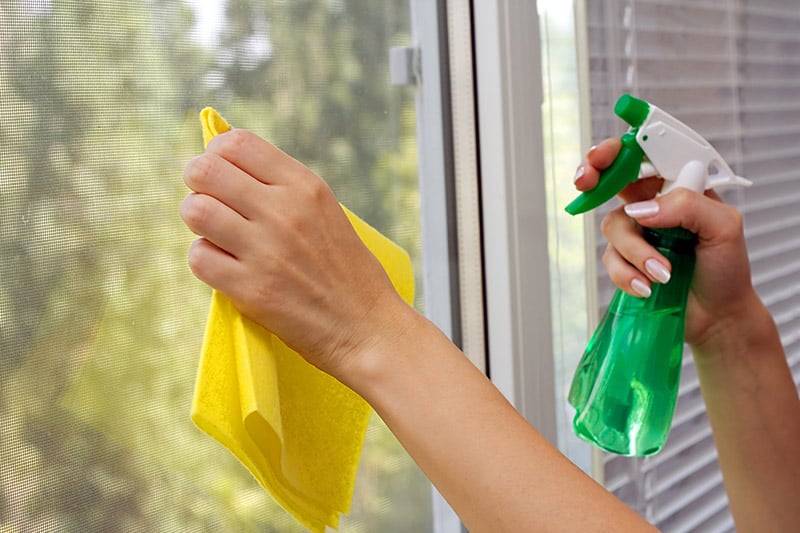 When you’re finished, your window is going to be streaky because of the dish soap you applied to lubricate the paint. This is an easy fix with some glass cleaner and a couple of paper towels or rags.
Cleaning the glass is the final step to get back your beautiful windows and that clear view. For more detail, check out our article on cleaning windows.
Preventing Paint From Getting on Your Windows
If you’re planning a paint job in a room with windows, or painting on or nearby a window frame, then you may want to consider prevention methods so you don’t have to remove paint later.
Tape
This is the traditional way to protect windows during paint projects, however, it can be a tedious method and in some cases of paint splatter, you still might get some on the windows. Depending on what you’re painting, using painter’s tape can take a long time to apply.
If it’s just being used around the window frame, that isn’t so bad, but if you’re painting the muntins, that’s a different story. Barricading off each individual muntin with painter’s tape is a long and tiring process and can be avoided when there are better options for paint prevention.
Masking Liquid
This genius of an invention beats taping up windows any day. Simply use a paintbrush to apply the masking liquid on each individual windowpane. Don’t worry, this masking liquid dries clear so your home won’t look blacked out and you’ll still have the light source of the sunlight coming through the window.
The masking liquid dries quickly and can be removed with ease, just use a razor blade to get it started then peel it off.
Lip Balm
This is an old trick for preventing paint on your windows, and the good news is you don’t even need a razor blade to remove it when you are done.
Apply lip balm on your windowpanes like you would with the masking liquid and remove it when your job is completed with a clean rag or applied heat.
It’s Important to Keep Paint Off Your Windows
Removing paint is an easy do-it-yourself job, and preventing paint from getting on the windows in the first place is even easier. Fortunately, paint on the window glass doesn’t mean you have to replace the entire pane again by any means.
Methods of prevention may take a little longer to set up, but once you walk away from a paint project with no need to get out a razor blade to remove dried paint from the panes, it all seems worth it. Removing paint is a quick and easy job that can be done by the most novice do-it-yourselfer.
Time to Replace Your Windows
Are you thinking of getting quality windows that are energy efficient, insulated, and custom made to match the style of your home? Over 400,000 delighted homeowners made the decision to choose Feldco for their home improvement needs. Speak to a product specialist and get a free quote today.