How to Properly Insulate Your Roof
You’ve learned to ignore drafty rooms and uneven heat in your home. Your roof collects stubborn ice dams in the winter. You may have picked up these clues that you need better insulation – or you’ve merely seen the evidence when your energy bill shows up. Read on to find out how to properly insulate your roof and set up your next project for success.
Why Roof Insulation?
Uninsulated homes lose up to 25% of their heat through the roof. That’s why it’s imperative to insulate the highest part of your home. This lowers energy bills, which is great if you’re looking to reduce your family’s carbon footprint. A high energy efficiency rating can even earn you a tax credit. Taking this step will increase your home’s resale value.
Determine What Kind of Roof Insulation Project You Need
When most people talk about insulating their roof, they may actually be referring to the attic or loft. Before you slap on any headlamps, you’re going to want to determine what kind of insulation project you need to do. There’s a difference between insulating the ceiling and the actual roof slope.
The general consensus is, if in doubt, attic insulation takes priority over direct roof insulation. It’s easier to knock out in a weekend, and it’s more relevant to most people’s goals when it comes to insulation.
Another thing to consider is whether you should do it yourself or call on the professionals. Often there are more issues than just the insulation, so you’ll want to rule out any conditions that would make it unsafe to DIY. These include, but aren’t limited to:
- Difficult attic access.
- Evidence of moisture issues, like leaks or soggy insulation.
- Poor ventilation.
- Pre-1930s wiring, which poses a fire hazard to insulation material.
If You’re Insulating the Roof Directly
To insulate the roof itself, you either use spray foam or retrofit with it with rigid foam board. An advantage of spray foam is it’s quick, whereas foam board needs to be cut and measured which can be a chore. But foam board – placed above the roof sheathing – is preferable to spray for this purpose because it has less chance of thermal bridging.
Insulating materials come rated by R-value. This refers to how well they resist the transfer of heat. R-value is determined by thickness, density, and material. Be aware that building codes determine the R-value of insulation required in each zone of your structure. This job will require stripping your roof, so it’s best to attempt it when you’re already replacing these parts.
If You’re Insulating the Attic
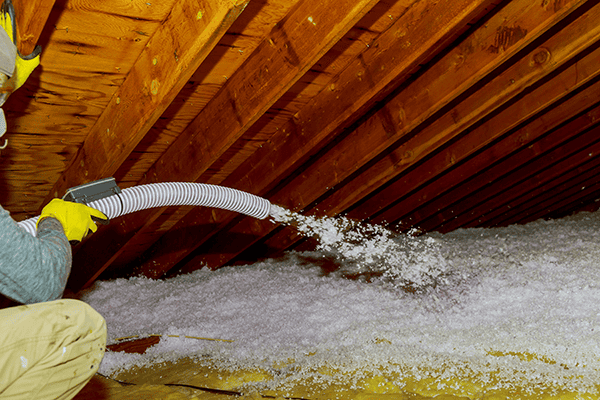
Most people are familiar with the pink stuff that goes into your walls. This insulation material comes in two styles: loose fill and batt. Loose fill, also called blown-in, can be packed into irregular spaces. This makes it good for attics with nonstandard joint spacing or low clearances.
Bear in mind that this option requires a blowing machine, so you may find it advisable to enlist a professional. At a minimum, you’ll need a second person to operate the machine while you work the hose.
From there the job is pretty straightforward: hook up the hose to the machine and direct fill where you want it to go. You may find it useful to cut and install barriers for this purpose and use your (gloved) hand as a guide.
Conversely, batts come on a roll and cover the area like a blanket. Therefore, they’re better for projects where you can put them on at once or are comfortable cutting them to fit around obstructions.
If using batts, unroll the fiberglass over the area. You want to cover the open ceiling plane and between any joists or studs. On the other hand, if you have recessed lights in the ceiling below, you’ll need to create barriers.
With a pair of pliers, cut wire mesh or sheet metal to size. This will become the barrier for the metal dome poking through the floor. Fit it around the recessed light and secure it with a staple gun. Additionally, don’t let insulation layover soffit vents.
There are many safety considerations to make when tackling this kind of DIY. Be sure to put on a protective mask and safety glasses. You don’t want direct skin contact with insulation, so wear long sleeves, pants, gloves and a hat. As you move around your attic, be sure to only step on the horizontal bars that support your ceiling. Don’t stand on the exposed drywall or insulation in between, as you risk falling through.
Something you may run into is that your attic is already insulated and you’re just improving on what’s already there. In that case, you don’t need to match the insulation that’s already put down. The only catch is you don’t want to mix loose fill with batts that have foil or paper backing. If the existing insulation is in bad shape, remove it before proceeding with the project.
Seal Up Any Remaining Gaps
You’ve just successfully completed your own insulation project. But remember that your insulation is worthless if there are leaks, which is why you need to consider air-sealing as well. This entails caulking up the gaps and tears where air can escape.
Find Out if You’re Eligible for Rebates
When you make energy improvements to your house, there are financial incentives available. Find out if you’re eligible for tax rebates or even weatherization assistance from your state. Additionally, some people’s first step might be getting an energy audit of their home to see if it’s worth it.
Get The Most Out of Your Home With Proper Roof Insulation
You put a lot into keeping your home running. But there are small improvements many homeowners overlook that can make a huge difference. Insulation puts the money back in your pocket by protecting your home from the elements and lowering energy costs. Whether you’re doing a weekend fix or folding it into a bigger home renovation, insulating your roof will pay off for years to come.
Choose Feldco Roofing For Your Brand New Roof
Looking for a new roofing contractor that gets the job done right the first time? Choose Feldco roofing for your next roofing installation or replacement. Get started with a free quote today.